

Windows11のVirtualBox(ver7.0)上に構築したAlmaLinux9.0に、GuestAdditionsをインストールする手順をまとめてみました。
VirtualBox 7.0 のインストール方法はこちら
VirtualBox(ver6系)&AlmaLinux8系向けの手順はこちらからどうぞ

環境
インストールした環境になります。
AlmaLinuxは最小限のインストールを行った直後の状態です。
作業は[root](特権ユーザ)で行っています。
- ホストマシン
- Windows11 Pro (21H2)
- VirtualBox (7.0)
- ゲストマシン(仮想マシン)AlmaLinux 9.0
- 最小限のインストール

各種パッケージのインストール
GuestAdditionsのインストールに必要なパッケージを導入します。
EPELリポジトリのインストール
[dnf]コマンドでパッケージをインストールしていきます。
まずは、EPELリポジトリをインストールしましょう。
「完了しました!」と表示されればOKです。
[root@STKWPS002 ~]# dnf install -y epel-release
AlmaLinux 9 - AppStream                                                                 6.3 MB/s | 8.8 MB     00:01
AlmaLinux 9 - BaseOS                                                                    3.7 MB/s | 4.3 MB     00:01
AlmaLinux 9 - Extras                                                                     14 kB/s |  13 kB     00:00
依存関係が解決しました。
========================================================================================================================
 パッケージ                      アーキテクチャー          バージョン                   リポジトリー              サイズ
========================================================================================================================
インストール:
 epel-release                    noarch                    9-2.el9                      extras                     17 k

トランザクションの概要
========================================================================================================================
インストール  1 パッケージ

ダウンロードサイズの合計: 17 k
インストール後のサイズ: 23 k
パッケージのダウンロード:
epel-release-9-2.el9.noarch.rpm                                                         239 kB/s |  17 kB     00:00
------------------------------------------------------------------------------------------------------------------------
合計                                                                                     19 kB/s |  17 kB     00:00
AlmaLinux 9 - Extras                                                                    3.0 MB/s | 3.1 kB     00:00
GPG 鍵 0xB86B3716 をインポート中:
 Userid     : "AlmaLinux OS 9 <packager@almalinux.org>"
 Fingerprint: BF18 AC28 7617 8908 D6E7 1267 D36C B86C B86B 3716
 From       : /etc/pki/rpm-gpg/RPM-GPG-KEY-AlmaLinux-9
鍵のインポートに成功しました
トランザクションの確認を実行中
トランザクションの確認に成功しました。
トランザクションのテストを実行中
トランザクションのテストに成功しました。
トランザクションを実行中
  準備             :                                                                                                1/1
  インストール中   : epel-release-9-2.el9.noarch                                                                    1/1
  scriptletの実行中: epel-release-9-2.el9.noarch                                                                    1/1
  検証             : epel-release-9-2.el9.noarch                                                                    1/1

インストール済み:
  epel-release-9-2.el9.noarch

完了しました!
パッケージのインストール
必要なパッケージを一気にインストールします。
「完了しました!」と表示されればOKです。
[root@STKWPS002 ~]# dnf install -y kernel-devel kernel-headers gcc gcc-c++ make bzip2 tar elfutils-libelf-devel perl dkms libX11.so.6 libXt libXmu
メタデータの期限切れの最終確認: 0:00:42 時間前の 2022年10月22日 12時40分22秒 に実施しました。
依存関係が解決しました。
========================================================================================================================
 パッケージ                              アーキテクチャー  バージョン                        リポジトリー         サイズ
========================================================================================================================
インストール:
 bzip2                                   x86_64            1.0.8-8.el9                       baseos                52 k
 dkms                                    noarch            3.0.7-1.el9                       epel                  58 k

~~ログ出力量が多いので省略~~

  unzip-6.0-56.el9.x86_64                                      zip-3.0-33.el9.x86_64
  zlib-devel-1.2.11-31.el9.x86_64

完了しました!
[root@STKWPS002 ~]#
再起動
インストール後は、再起動を行います。
[root@STKWPS002 ~]# systemctl reboot

GuestAdditionsのインストール
GuestAdditionsのインストールを行っていきます。
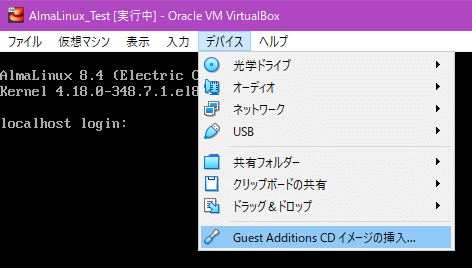
まずは、VirtualBoxのGUIメニュー「デバイス」より「Guest Additions CDイメージの挿入」をクリックします。
挿入したイメージファイルをマウントします。
[root@STKWPS002 ~]# mkdir -p /mnt/cdrom
[root@STKWPS002 ~]# mount -r /dev/cdrom /mnt/cdrom
GuestAdditionsのインストールシェル「VBoxLinuxAdditions.run」を実行します。
失敗時は「modprobe vboxguest failed」などが表示されます。
特にこれらが表示されずにプロンプトが戻ればインストール完了となります。
[root@STKWPS002 ~]# sh /mnt/cdrom/VBoxLinuxAdditions.run
Verifying archive integrity...  100%   MD5 checksums are OK. All good.
Uncompressing VirtualBox 7.0.0 Guest Additions for Linux  100%
VirtualBox Guest Additions installer
VirtualBox Guest Additions: Starting.
VirtualBox Guest Additions: Setting up modules
VirtualBox Guest Additions: Building the VirtualBox Guest Additions kernel
modules.  This may take a while.
VirtualBox Guest Additions: To build modules for other installed kernels, run
VirtualBox Guest Additions:   /sbin/rcvboxadd quicksetup <version>
VirtualBox Guest Additions: or
VirtualBox Guest Additions:   /sbin/rcvboxadd quicksetup all
VirtualBox Guest Additions: Building the modules for kernel
5.14.0-70.26.1.el9_0.x86_64.
以上で、VirtualBox GuestAdditionsのインストールは完了となります。
リンク
コメント