MIRACLE LINUX 9.0環境に、Nginxのバージョン1.20をインストールする方法を解説します。
はじめに
ここでは、MIRACLE LINUX 9.0に、Nginxをインストールする方法を解説します。
また、Nginxサービスの停止や起動、設定ファイルの格納先など、基本的な使い方も説明したいと思います。
国産Linux「MIRACLE LINUX」のインストール方法は、以下をご覧ください。
インストール手順
ここでは、Nginxのインストール方法を説明します。
*作業は、rootユーザーで実施します。
まず、インストールするOSを確認します。
[root@STKWEB001 ~]# cat /etc/redhat-release
MIRACLE LINUX release 9.0 (Feige)
OSが「MIRACLE LINUX」であることが確認出来ました。
では、Nginxのインストールを行います。
[root@STKWEB001 ~]# dnf install -y nginx
メタデータの期限切れの最終確認: 3:36:48 時間前の 2022年11月26日 15時43分34秒 に実施しました。
依存関係が解決しました。
===========================================================================================================================================
 パッケージ                               アーキテクチャー       バージョン                       リポジトリー                       サイズ
===========================================================================================================================================
インストール:
 nginx                                    x86_64                 1:1.20.1-10.el9                  9-latest-AppStream                 594 k
依存関係のインストール:
 miraclelinux-logos-httpd                 noarch                 90.4-1.el9.ML.5                  9-latest-AppStream                  13 k
 nginx-filesystem                         noarch                 1:1.20.1-10.el9                  9-latest-AppStream                  11 k

トランザクションの概要
===========================================================================================================================================
インストール  3 パッケージ

ダウンロードサイズの合計: 618 k
インストール後のサイズ: 1.8 M
パッケージのダウンロード:
(1/3): miraclelinux-logos-httpd-90.4-1.el9.ML.5.noarch.rpm                                                  21 kB/s |  13 kB     00:00
(2/3): nginx-filesystem-1.20.1-10.el9.noarch.rpm                                                            18 kB/s |  11 kB     00:00
(3/3): nginx-1.20.1-10.el9.x86_64.rpm                                                                      890 kB/s | 594 kB     00:00
-------------------------------------------------------------------------------------------------------------------------------------------
合計                                                                                                       659 kB/s | 618 kB     00:00
トランザクションの確認を実行中
トランザクションの確認に成功しました。
トランザクションのテストを実行中
トランザクションのテストに成功しました。
トランザクションを実行中
  準備             :                                                                                                                   1/1
  scriptletの実行中: nginx-filesystem-1:1.20.1-10.el9.noarch                                                                           1/3
  インストール中   : nginx-filesystem-1:1.20.1-10.el9.noarch                                                                           1/3
  インストール中   : miraclelinux-logos-httpd-90.4-1.el9.ML.5.noarch                                                                   2/3
  インストール中   : nginx-1:1.20.1-10.el9.x86_64                                                                                      3/3
  scriptletの実行中: nginx-1:1.20.1-10.el9.x86_64                                                                                      3/3
  検証             : miraclelinux-logos-httpd-90.4-1.el9.ML.5.noarch                                                                   1/3
  検証             : nginx-1:1.20.1-10.el9.x86_64                                                                                      2/3
  検証             : nginx-filesystem-1:1.20.1-10.el9.noarch                                                                           3/3

インストール済み:
  miraclelinux-logos-httpd-90.4-1.el9.ML.5.noarch        nginx-1:1.20.1-10.el9.x86_64        nginx-filesystem-1:1.20.1-10.el9.noarch

完了しました!
「完了しました!」と表示されれば、インストールは完了です。
インストールした Nginxのバージョンを確認します。
[root@STKWEB001 ~]# nginx -v
nginx version: nginx/1.20.1
バージョン「1.20.1」がインストールされたことが分かります。
次に、Nginxの起動状態を確認します。
[root@STKWEB001 ~]# systemctl status nginx
○ nginx.service - The nginx HTTP and reverse proxy server
     Loaded: loaded (/usr/lib/systemd/system/nginx.service; disabled; vendor preset: disabled)
     Active: inactive (dead)
上記のように表示された場合は起動していないため、起動コマンドを実行します。
[root@STKWEB001 ~]# systemctl start nginx
再度、起動状態を確認します。
[root@STKWEB001 ~]# systemctl status nginx
● nginx.service - The nginx HTTP and reverse proxy server
     Loaded: loaded (/usr/lib/systemd/system/nginx.service; disabled; vendor preset: disabled)
     Active: active (running) since Sat 2022-11-26 19:21:02 JST; 3s ago
    Process: 17607 ExecStartPre=/usr/bin/rm -f /run/nginx.pid (code=exited, status=0/SUCCESS)
    Process: 17614 ExecStartPre=/usr/sbin/nginx -t (code=exited, status=0/SUCCESS)
    Process: 17623 ExecStart=/usr/sbin/nginx (code=exited, status=0/SUCCESS)
   Main PID: 17634 (nginx)
      Tasks: 3 (limit: 11124)
     Memory: 2.8M
        CPU: 110ms
     CGroup: /system.slice/nginx.service
             tq17634 "nginx: master process /usr/sbin/nginx"
             tq17636 "nginx: worker process"
             mq17637 "nginx: worker process"

11月 26 19:21:02 STKWEB001 systemd[1]: Starting The nginx HTTP and reverse proxy server...
11月 26 19:21:02 STKWEB001 nginx[17614]: nginx: the configuration file /etc/nginx/nginx.conf syntax is ok
11月 26 19:21:02 STKWEB001 nginx[17614]: nginx: configuration file /etc/nginx/nginx.conf test is successful
11月 26 19:21:02 STKWEB001 systemd[1]: Started The nginx HTTP and reverse proxy server.
無事、起動されました。
次は、OS起動時に Nginxが自動で起動されるように設定します。
[root@STKWEB001 ~]# systemctl enable nginx
Created symlink /etc/systemd/system/multi-user.target.wants/nginx.service → /usr/lib/systemd/system/nginx.service.
以上で、インストールは完了です。
次項で、疎通確認する方法を説明します。
疎通確認
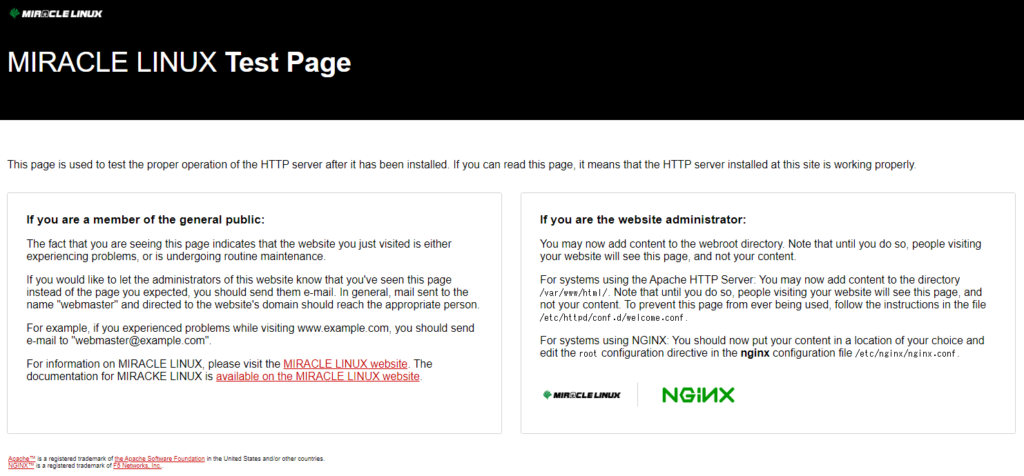
ここでは、ブラウザからNginxの初期画面が表示されるかの確認を行います。
ブラウザに、以下のURLを入力します。
http://<NginxをインストールしたサーバーのIPアドレス>
下記の画面が表示されれば、疎通確認は完了となります。

Nginxの基本的な使い方
ここでは、Nginxを操作するコマンドや、設定ファイルの格納先などを説明します。
コマンド
・サービスの停止
systemctl stop nginx
・サービスの起動
systemctl start nginx
・サービスの再起動
systemctl restart nginx
・サービスの状態確認
systemctl status nginx
・自動起動の設定
systemctl enable nginx
・バージョン確認
nginx -v
設定ファイルやログの格納先
・設定ファイルの格納先
/etc/nginx/nginx.conf
・アクセスログの格納先
/var/log/nginx/access.log
・エラーログの格納先
/var/log/nginx/error.log
・ルートディレクトリ
/usr/share/nginx/html


コメント