
C#でストップウォッチを使用し、処理途中の時間を取得する方法を解説します。
前回は、処理の開始から終了までの時間を計測する方法を説明しました。
今回は、処理の開始から処理Aまでの時間を取得しつつ、処理終了までの時間も取得するような処理途中の時間を計測する方法を説明していきたいと思います。
事前準備
事前準備として、ボタンとテキストボックスを配置した簡単な画面を作成します。
ボタンは処理の開始用、テキストボックスは処理時間の表示用です。
以下は、デザインのコードです。
namespace WinFormsApp2
{
    partial class Form1
    {
        /// <summary>
        ///  Required designer variable.
        /// </summary>
        private System.ComponentModel.IContainer components = null;

        /// <summary>
        ///  Clean up any resources being used.
        /// </summary>
        /// <param name="disposing">true if managed resources should be disposed; otherwise, false.</param>
        protected override void Dispose(bool disposing)
        {
            if (disposing && (components != null))
            {
                components.Dispose();
            }
            base.Dispose(disposing);
        }

        #region Windows Form Designer generated code

        /// <summary>
        ///  Required method for Designer support - do not modify
        ///  the contents of this method with the code editor.
        /// </summary>
        private void InitializeComponent()
        {
            textBox1 = new TextBox();
            button1 = new Button();
            textBox2 = new TextBox();
            label1 = new Label();
            label2 = new Label();
            textBox3 = new TextBox();
            label3 = new Label();
            SuspendLayout();
            //
            // textBox1
            //
            textBox1.Font = new Font("Yu Gothic UI", 11.25F);
            textBox1.Location = new Point(154, 37);
            textBox1.Name = "textBox1";
            textBox1.Size = new Size(138, 27);
            textBox1.TabIndex = 0;
            //
            // button1
            //
            button1.Location = new Point(154, 4);
            button1.Name = "button1";
            button1.Size = new Size(138, 27);
            button1.TabIndex = 1;
            button1.Text = "button1";
            button1.UseVisualStyleBackColor = true;
            button1.Click += button1_Click;
            //
            // textBox2
            //
            textBox2.Font = new Font("Yu Gothic UI", 11.25F);
            textBox2.Location = new Point(154, 70);
            textBox2.Name = "textBox2";
            textBox2.Size = new Size(138, 27);
            textBox2.TabIndex = 2;
            //
            // label1
            //
            label1.AutoSize = true;
            label1.Font = new Font("Yu Gothic UI", 14.25F, FontStyle.Regular, GraphicsUnit.Point, 128);
            label1.Location = new Point(12, 37);
            label1.Name = "label1";
            label1.Size = new Size(119, 25);
            label1.TabIndex = 3;
            label1.Text = "開始~処理A";
            //
            // label2
            //
            label2.AutoSize = true;
            label2.Font = new Font("Yu Gothic UI", 14.25F, FontStyle.Regular, GraphicsUnit.Point, 128);
            label2.Location = new Point(13, 103);
            label2.Name = "label2";
            label2.Size = new Size(107, 25);
            label2.TabIndex = 4;
            label2.Text = "開始~終了";
            //
            // textBox3
            //
            textBox3.Font = new Font("Yu Gothic UI", 11.25F);
            textBox3.Location = new Point(154, 103);
            textBox3.Name = "textBox3";
            textBox3.Size = new Size(138, 27);
            textBox3.TabIndex = 5;
            //
            // label3
            //
            label3.AutoSize = true;
            label3.Font = new Font("Yu Gothic UI", 14.25F, FontStyle.Regular, GraphicsUnit.Point, 128);
            label3.Location = new Point(12, 70);
            label3.Name = "label3";
            label3.Size = new Size(118, 25);
            label3.TabIndex = 6;
            label3.Text = "開始~処理B";
            //
            // Form1
            //
            AutoScaleDimensions = new SizeF(7F, 15F);
            AutoScaleMode = AutoScaleMode.Font;
            ClientSize = new Size(304, 141);
            Controls.Add(label3);
            Controls.Add(textBox3);
            Controls.Add(label2);
            Controls.Add(label1);
            Controls.Add(textBox2);
            Controls.Add(button1);
            Controls.Add(textBox1);
            Name = "Form1";
            Text = "Form1";
            ResumeLayout(false);
            PerformLayout();
        }

        #endregion

        private TextBox textBox1;
        private Button button1;
        private TextBox textBox2;
        private Label label1;
        private Label label2;
        private TextBox textBox3;
        private Label label3;
    }
}
ソースコード
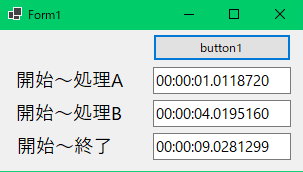
ボタンをクリックすることで、処理開始から処理途中、処理終了までの時間を計測し、テキストボックスに計測結果を表示するソースコードです。
using System.Diagnostics;

namespace WinFormsApp2
{
    public partial class Form1 : Form
    {
        public Form1()
        {
            InitializeComponent();
        }

        private void button1_Click(object sender, EventArgs e)
        {
            // Stopwatchインスタンスの作成
            Stopwatch stopwatch = new();

            // 計測開始
            stopwatch.Start();

            // 時間を計測したい処理
            Thread.Sleep(1000);

            // 計測時間を表示(処理開始~処理Aまで)
            textBox1.Text = stopwatch.Elapsed.ToString();

            // 時間を計測したい処理
            Thread.Sleep(3000);

            // 計測時間を表示(処理開始~処理Bまで)
            textBox2.Text = stopwatch.Elapsed.ToString();

            // 時間を計測したい処理
            Thread.Sleep(5000);

            // 計測終了
            stopwatch.Stop();

            // 計測時間を表示(処理開始~処理終了まで)
            textBox3.Text = stopwatch.Elapsed.ToString();
        }
    }
}
24行目にある「stopwatch.Elapsed.ToString();」を、ストップウォッチを止めずに実行することで、処理開始から現在までの時間を取得することが出来ます。
実行イメージ
以下は、実行イメージになります。
関連記事


コメント