
C#でフォームがあるクラスとは別のクラスからフォームを操作する方法を解説します。
前回ご紹介した方法では、デザインを変更した際に設定が戻ってしまいました。
今回はデザインを変更しても設定が戻らない方法となります。
事前準備
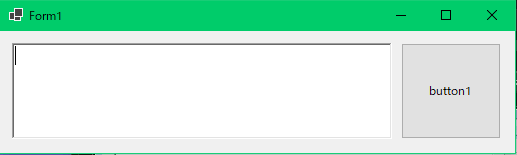
まずは、動作確認するための画面を作成します。
ここでは、リッチテキストボックスとボタンを配置しました。
上記フォームのソースコード(Form1.Designer.cs)です。
namespace WinFormsApp1
{
    partial class Form1
    {
        /// <summary>
        ///  Required designer variable.
        /// </summary>
        private System.ComponentModel.IContainer components = null;

        /// <summary>
        ///  Clean up any resources being used.
        /// </summary>
        /// <param name="disposing">true if managed resources should be disposed; otherwise, false.</param>
        protected override void Dispose(bool disposing)
        {
            if (disposing && (components != null))
            {
                components.Dispose();
            }
            base.Dispose(disposing);
        }

        #region Windows Form Designer generated code

        /// <summary>
        ///  Required method for Designer support - do not modify
        ///  the contents of this method with the code editor.
        /// </summary>
        private void InitializeComponent()
        {
            richTextBox1 = new RichTextBox();
            button1 = new Button();
            SuspendLayout();
            //
            // richTextBox1
            //
            richTextBox1.Location = new Point(12, 12);
            richTextBox1.Name = "richTextBox1";
            richTextBox1.Size = new Size(380, 96);
            richTextBox1.TabIndex = 1;
            richTextBox1.Text = "";
            //
            // button1
            //
            button1.Location = new Point(401, 12);
            button1.Name = "button1";
            button1.Size = new Size(100, 96);
            button1.TabIndex = 2;
            button1.Text = "button1";
            button1.UseVisualStyleBackColor = true;
            button1.Click += button1_Click;
            //
            // Form1
            //
            AutoScaleDimensions = new SizeF(7F, 15F);
            AutoScaleMode = AutoScaleMode.Font;
            ClientSize = new Size(515, 122);
            Controls.Add(button1);
            Controls.Add(richTextBox1);
            Name = "Form1";
            Text = "Form1";
            Load += Form1_Load;
            ResumeLayout(false);
        }

        #endregion
        private RichTextBox richTextBox1;
        private Button button1;
    }
}
サンプルコード
別クラスのメソッドからフォームを操作するためのソースコードです。
ここでは例として、ボタンを押した時にリッチテキストボックスに文字が入力されるようにします。
また、リッチテキストボックスは「Form1.cs」で作成し、文字の入力処理は別クラスとなる「Util.cs」に作成します。
Form1.cs
namespace WinFormsApp1
{
    public partial class Form1 : Form
    {
        public Form1()
        {
            InitializeComponent();
        }

        private void Form1_Load(object sender, EventArgs e)
        {
            Util.SetRichTextBox(richTextBox1);
        }

        private void button1_Click(object sender, EventArgs e)
        {
            Util.WriteRichTextBox("文字列1");
            Util.WriteRichTextBox("文字列2");
            Util.WriteRichTextBox("文字列3");
        }
    }
}
Util.cs
namespace WinFormsApp1
{
public class Util
{
private static RichTextBox _rtb;
public static void SetRichTextBox(RichTextBox rtb)
{
_rtb = rtb;
}
public static void WriteRichTextBox(String str)
{
_rtb.AppendText(str + "\n");
}
}
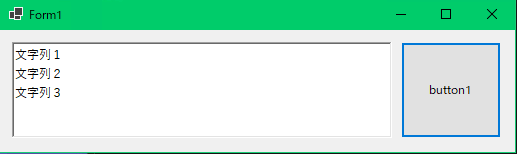
}実行イメージ
ボタンを押して、リッチテキストボックスに文字列が表示されれば正常に動いています。
リンク

コメント