
本記事では、C#を使用してファイルから特定の範囲のバイナリデータを16進数形式で取得するメソッドの実装方法について解説します。
事前準備
事前準備として、ボタンとテキストボックスを配置した簡単な画面を作成します。
ボタンは処理の開始用、テキストボックスはデータを取得するファイルパスの入力用です。
以下は、デザインのコードです。
namespace WinFormsApp2
{
    partial class Form1
    {
        /// <summary>
        ///  Required designer variable.
        /// </summary>
        private System.ComponentModel.IContainer components = null;

        /// <summary>
        ///  Clean up any resources being used.
        /// </summary>
        /// <param name="disposing">true if managed resources should be disposed; otherwise, false.</param>
        protected override void Dispose(bool disposing)
        {
            if (disposing && (components != null))
            {
                components.Dispose();
            }
            base.Dispose(disposing);
        }

        #region Windows Form Designer generated code

        /// <summary>
        ///  Required method for Designer support - do not modify
        ///  the contents of this method with the code editor.
        /// </summary>
        private void InitializeComponent()
        {
            textBox1 = new TextBox();
            button1 = new Button();
            SuspendLayout();
            //
            // textBox1
            //
            textBox1.Location = new Point(12, 12);
            textBox1.Name = "textBox1";
            textBox1.Size = new Size(292, 23);
            textBox1.TabIndex = 0;
            //
            // button1
            //
            button1.Location = new Point(310, 12);
            button1.Name = "button1";
            button1.Size = new Size(75, 23);
            button1.TabIndex = 1;
            button1.Text = "button1";
            button1.UseVisualStyleBackColor = true;
            button1.Click += button1_Click;
            //
            // Form1
            //
            AutoScaleDimensions = new SizeF(7F, 15F);
            AutoScaleMode = AutoScaleMode.Font;
            ClientSize = new Size(397, 49);
            Controls.Add(button1);
            Controls.Add(textBox1);
            Name = "Form1";
            Text = "Form1";
            ResumeLayout(false);
            PerformLayout();
        }

        #endregion

        private TextBox textBox1;
        private Button button1;
    }
}
ソースコード
ファイルのパスを入力し、ボタンをクリックすることで、ファイルのバイナリデータを16進数で表示するソースコードです。
using System.Diagnostics;

namespace WinFormsApp2
{
    public partial class Form1 : Form
    {
        public Form1()
        {
            InitializeComponent();
        }

        private void button1_Click(object sender, EventArgs e)
        {
            // ファイルから16進数の文字列を取得
            string hexData = ReadBytesAsHex(textBox1.Text, 0, 10);

            // コンソールに出力
            Debug.WriteLine(hexData);
        }

        public static string ReadBytesAsHex(string filePath, long offset, int byteCount)
        {
            // ファイルの存在を確認
            if (!File.Exists(filePath))
            {
                throw new FileNotFoundException($"指定されたファイルが見つかりません: {filePath}");
            }

            // ファイルストリームを開く
            FileStream fs = new(filePath, FileMode.Open, FileAccess.Read);

            // オフセットがファイルサイズを超えないか確認
            if (offset < 0 || offset >= fs.Length)
            {
                throw new ArgumentOutOfRangeException(nameof(offset), "オフセットが無効です。");
            }

            // 読み取るバイト数がファイルの残りのバイト数を超えないか確認
            if (byteCount < 0 || offset + byteCount > fs.Length)
            {
                throw new ArgumentOutOfRangeException(nameof(byteCount), "バイト数が無効です。");
            }

            // 読み取るバイトのバッファを作成
            byte[] buffer = new byte[byteCount];

            // 指定されたオフセットにシーク
            fs.Seek(offset, SeekOrigin.Begin);

            // バイトを読み取る
            int bytesRead = fs.Read(buffer, 0, byteCount);

            // 16進数の文字列を作成
            return BitConverter.ToString(buffer, 0, bytesRead).Replace("-", " ");
        }
    }
}
21~55行目が今回の処理を行うメソッドで、引数は以下となります。
引数1:ファイルのパス
引数2:読み取りを開始するオフセット(何バイト目から読み取りを開始するかを指定)
引数3:読み取るバイト数
15行目でメソッドを呼び出しています。
ここでは、ファイルの先頭から、10バイト分までを指定しています。
実行イメージ
以下は、ファイルのバイナリデータを取得した結果です。
50 4B 03 04 14 00 00 00 00 00
以下は、ファイルをバイナリエディターで読み込んだ結果です。
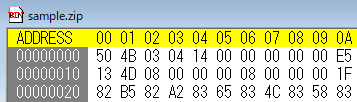
値が一致しているので取得したデータに問題はないようです。
記事は以上となります。
リンク

コメント